Do you want to cook in your classroom but don’t know where to start? Don’t worry, it’s easier than you think.
Do you want to cook in your classroom but don’t know where to start? Don’t worry, it’s easier than you think. This article will help you incorporate food into your lesson plan, plus help you meet curriculum outcomes.
Let’s get started!
Level 1—Take a Test Drive: Recipes are very simple and require minimal kitchen equipment. Recipes can be prepared by individuals or in groups.
Level 2—Classroom Creations: Recipes are slightly more advanced. No heating of food is required. Recipes are best prepared in small groups.
Level 3—Canadian Iron Chef. Recipes are the most advanced. A hot plate, electric skillet, or a table-top griddle may be required. Recipes are best prepared in small groups.
Level 1—Take a Test Drive Series
Food skills: washing, measuring and mixing
Recipe Ideas: Ice cream in a bag, Yogurt Sundaes, 3-2-1 dressing, Trail Mix (e.g. sunflower seeds, pumpkin seeds, raisins, dried cranberries)
Utensils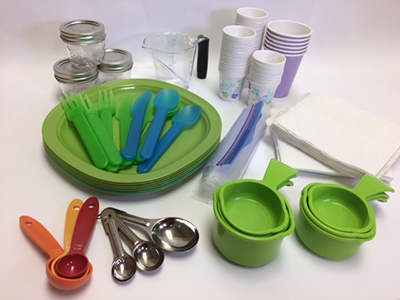
- Re-sealable bags (small and large)
- Dry measuring cups
- Wet measuring cups
- Measuring spoons
- Glass jars
- Reusable cups, plates, and cutlery
- Napkins
- Kitchen towels
- Dishwashing liquid
- Sponge/scrub brush
Level 2—Classroom Creations Series
Recipe Ideas: Bio-Bites, After Schools Apple “Cookies”, Fruity Water, Drinks and Smoothies, Checkerboard sandwiches, Veggie-rolls and fruit kabobs, Friendship fruit salad, fruit sampling
Utensils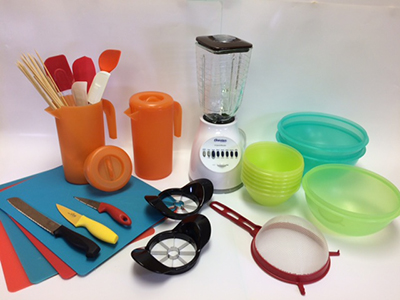
- Colander/Strainer
- Mixing bowls: (large, medium, small)
- Knives
- Cutting Boards
- Water Pitcher
- Fruit Slicer
- Rubber Spatulas
- Blender
- Wooden skewers
*Recipes still require measuring devices, plates, cups and cutlery from the Take a Test Drive series.
Tip: Wash produce in advance or make it part of the lesson.
Level 3—Canadian Iron Chef Series
Food skills: washing, mixing, measuring, cutting, slicing, baking, grating, flipping, spreading
Recipe Ideas: Making bread and butter, Making cheese, Confetti pancakes, Easy pumpkin muffin bars, Mini pizzas, Quesadillas
Utensils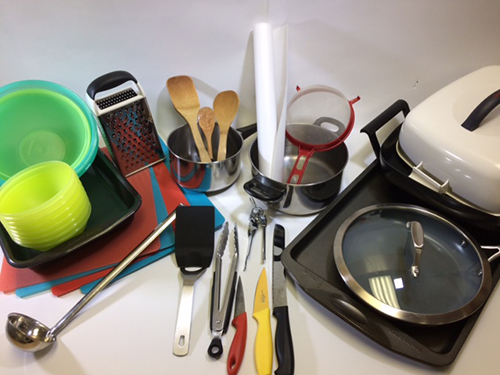
- Ladle
- Colander/Strainer
- Cheese grater
- Cookie sheet tray
- Tongs
- Parchment paper
- Baking pan
- Wooden Spoons, spatula/flipper
- Can Opener
- Cutting Boards
- Knives
- Bowls (Large, medium, small)
- Pots, pans, skillet
- Electric Griddle
*Recipes still require measuring devices, plates, cups and cutlery from the Take a Test Drive series.
Things to Think about
1) How much food do you need for your class?
Using food in your classroom is a great opportunity for students to taste and explore food but it is not a substitute for a meal or a snack.
As a general rule, allow these amounts per student:
- A recipe that feeds 4-6 adults provides a sample for a class of 16-20 students.
- Slices of bread, pita, tortillas, bagels, or English muffins: ¼ of each per student.
- Smoothies, yogurts, juices, and drinks: ¼ cup per student.
- Seeds, trail mix, and granolas: 2 Tablespoons per student.
- Whole fruit: divide each slice into 6-8 pieces depending on the size.
2) How should I organize my classroom?
Everyone’s classroom set up is different. Here’s one example of a teacher dividing students into small groups to make smoothies:
“I decided to push four desks together at the back of the classroom to make one large workspace. I had to place the blender closest to the outlet because I didn’t have an extension cord. I then laid out the ingredients, measuring cups and tasting cups. Next to the table, I kept the milk, yogurt, and frozen fruit cold by placing it in a cooler with an ice pack. Each group came up to the table and took turns measuring and making their smoothie. Before tasting, each group had to go back to their desks and try what they made together. Students were not required to sample the smoothie, but were required to sit with their group and talk about their experience.“
3) What if a student refuses to take a taste of the recipe?
Do not pressure students into trying any food if they choose not to. This is a time to simply say “yes please” or “no thank you.” Encourage students to still sit together even if they choose not to taste.
4) What about food and kitchen safety?
- Keep first aid kits accessible and always practice appropriate food safety.
- Remind students about basic kitchen safety such as keeping pot handles turned away from the outer edge of the stove or table and turning off cooking appliances after use.
- Find out how to teach your kids knife skills.
5) What about food costs?
Teachers throughout BC who have taken one of our workshops are eligible to apply for one of our mini-food grants. Haven’t taken a workshop? It only takes about an hour. Find out more about how to take a workshop.
6) Curriculum Links
Linking food to nutrition education lesson plans and programs covers the Big Ideas and Learning Standards in the Physical and Health Education BC curriculum and can also link to most other subject areas.
7) Thinking Big
If resources are available at your school, stocking a mobile cooking cart for many classes to enjoy is a wonderful addition. If properly cared for, it can last for years! One option is to connect with your Parent Advisory Council for available funds.
| Quantity | Item |
|---|---|
| Multiple |
Assorted sizes of pots with lids |
|
1-2 boxes |
Resealable plastic bags (large and small) |
| 2 | baking sheets |
| 1 | blender |
|
2 |
baking pans or dishes |
| 1 | can opener |
| 5 |
citrus juicers, small |
| 1 | colander |
| 10 | cutting boards, small plastic |
| 1 bottle | dishwashing liquid |
| 3 | bowls, mixing, assorted sizes |
| 1-2 | electric skillet or hotplate |
| 1 | first aid kit |
| 5 | graters, box |
| 1 | hand mixer |
| 4 | kitchen towels |
| 1 | ladle |
| 5 sets | measuring cups |
| 5 sets | measuring spoons |
| 4 | potholders |
| 2 | rolling pins |
| 1 | salad spinner |
| 2 | skillets, large (12″-14″) |
| 2 | spoons, large wooden |
| 1 | spoon, slotted |
| 2 | spatulas |
| 5 | sponges with rough side |
| 10 | spreaders (serrated with rounded end) |
| 1 | steamer insert for pot |
| 1 set | tongs |
| 5 | vegetable peelers |
| 3 | whisks, assorted sizes |
| 5 | whisks, medium |
| 1 | knife, chef’s |
