Thinking of canning this summer? If you haven’t canned before, start with fruit. High-acid foods like fruit can be safely canned using the boiling water bath method. Follow these ten steps to organize your workflow.
- Fill your canning kettle with water and start bringing it to a boil. This can take some time so get this started first.
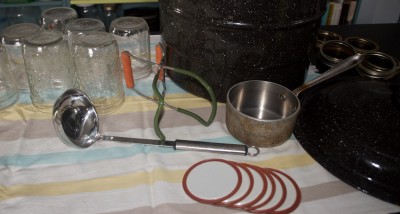
- Get all your jars ready. Use jars intended for canning; examine them to make sure they don’t have any cracks or chips.
- Sterilize
• Sterilize your jars if your canning recipe calls for less than 10 minutes of canning time, as is the case for jam, jelly and pickle recipes. Run them through a sterilizing cycle in the dishwasher, or place them on a canning rack and immerse them, right side up, in your canning kettle; boil them for 10 minutes. Remove the jars from the boiling water and place them upside down on a clean cloth.• You’ll also want to sterilize any other equipment you use, such as a canning funnel or a ladle. Lids should be sterilized according to manufacturer instructions. A separate, small saucepan is generally a handier way to sterilize lids.
- Use a recipe from a reputable source. Many recipes handed down in families or floating around on the internet do not follow the latest recommended procedures, and may pose a safety risk. We recommend Bernardin (www.bernardin.ca) or the National Center for Home Food Preservation (http://nchfp.uga.edu) as a source for reliable information. Prepare your fruit according to the recipe.
- Fill the jars—this is where a funnel with a wide opening can help. Be sure to fill to the level indicated in the recipe. Leaving the proper headspace ensures you will get a proper vacuum seal. Tomatoes, for example, should be filled to within 1/2 inch from the top, while 1/4 inch is good for jams and jellies. Using a flat plastic spatula, poke to the bottom of the filled jar to remove any air bubbles.
- Wipe the jar rims using a moistened clean cloth or paper towel. Place the canning lids on the jars and screw the metal bands on just until they stop—no need to make it super-tight.
- Immerse in the boiling water bath. Place the jars on a canning rack and immerse in the boiling water. Be sure there is enough water to cover the jars by at least 1 inch. Cover the pot.
- Time it. Wait until the water comes to a full rolling boil and then start your timer. Be sure you are using the time indicated for the product you are canning in the size jar you are using. Keep the bath at a full rolling boil during the entire time.
This is a steamy process! You may find that you have to top up your boiling water bath if you are doing more than one batch. It’s handy to have a tea kettle full of boiling water at the ready.
- Remove the jars and test the seals. When the time is up, lift up the rack, and using jar tongs, remove the jars and place them on a cloth on your counter. As the jars cool, you may hear the snap as the lids are sucked down to form a vacuum. When the jars are cool, test for a proper seal—the lids should be curved down. You shouldn’t be able to press them down any further.
If one of your jars didn’t seal properly, you’ll need to store it in the fridge and eat the contents soon. If several jars didn’t seal properly, you may go through the boiling water bath procedure again, as long as it’s within 24 hours. Wipe the rims of the jars clean and use a fresh lid, prepared according to the manufacturer. Wait for the boiling water bath to come to a full rolling boil and time the process as before.
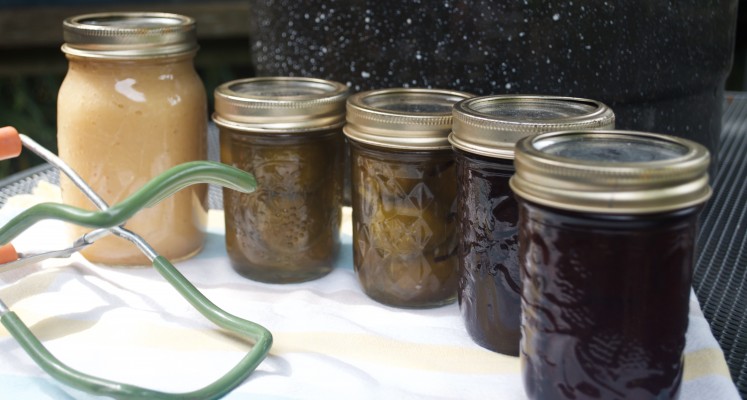
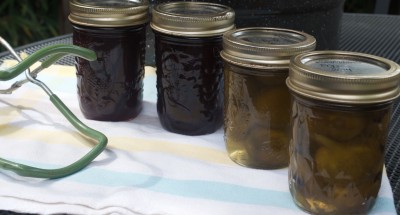
- Label your jars. You can do this the next day or when your jars are cool. I use a permanent marker and write on the lid. Don’t forget to include the year!
Canning isn’t a job you’ll knock off in an hour. The time it takes depends on the food you are canning, how involved the food preparation is and the number of batches you are doing. You’ll probably want to set aside an afternoon when you aren’t in a rush.
If you organize your workspace and give yourself enough time for all that boiling, you will be rewarded by full, bejeweled pantry shelves showing off your handiwork.
Next winter, when you get ready to make chili, you can open one of your jars of tomatoes and remember summer fondly.
For more detailed information on canning, refer to the Complete Guide to Home Canning. We also highly recommend the latest copy of Putting Food By, a veritable bible for home food preservation.
By Sydney Massey, MPH, RD